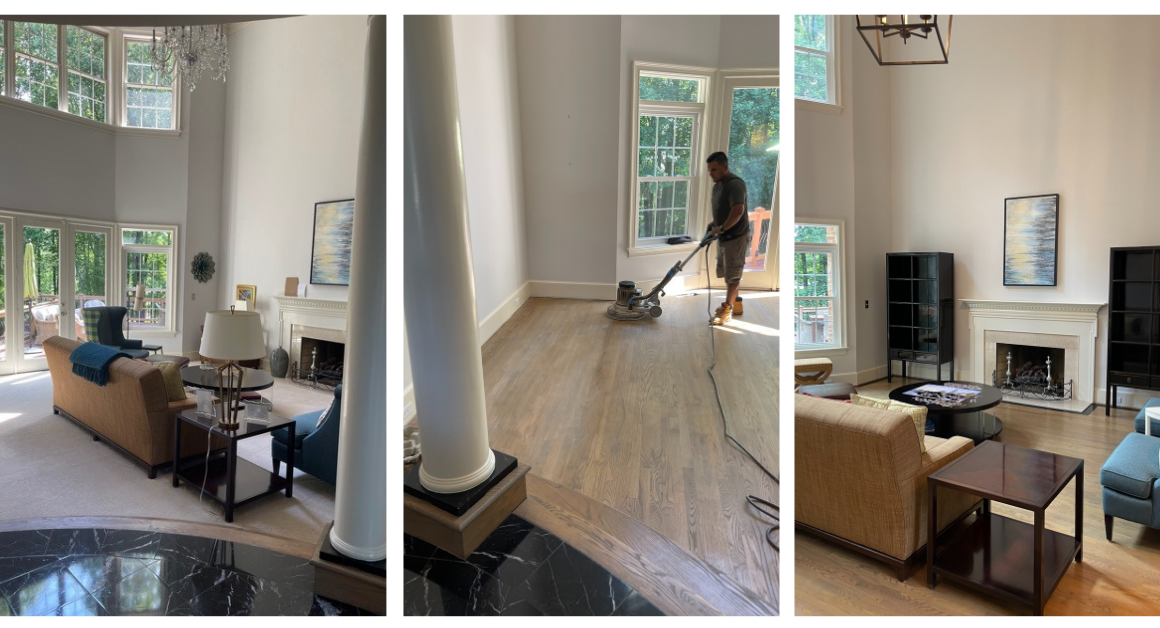
Fabulous Find Underneath Wall to Wall Carpeting

Today we are back in Great Falls, Virginia, working with a client to remodel their living room. When I saw the space, I instantly felt that the wall-to-wall carpeting was outdated and needed to go. Wall-to-Wall carpeting can sometimes work, but in most cases, it makes the room seem smaller. Not to mention that wall-to-wall carpeting traps a lot of dust, which is no good for anyone with allergies. The other issue with wall-to-wall carpeting is that it makes it more difficult to split the room up into sections, whereas using rugs allows the floor to be divided up. 

All this to say that the wall-to-wall carpeting needed to go. Keep reading to find out how this first step led to the transformation of this living room floor. 

Tearing Up The Carpeting

My lovely contractors and I got to work tearing up the old carpet. It had been installed in sections, so we began removing each carpet piece, the padding, and the tack strips. And guess what we found?! The most beautiful hardwood floors that I knew would look stunning with a bit of TLC. The wood was in great condition and just needed a little restoration and detail work. I was relieved to see this because when removing the carpet you don’t always know what you’re going to find underneath. Oftentimes, it reveals damaged or molding floorboards. We were all so delighted to find the beautiful woodwork.

Preparing the Design

As soon as my client and I saw the beautiful wood floor, we knew it was going to stay. But I knew some detail work would take this from a nice living room to a stunning living room. The living room is two steps down from a landing that features black marble. There are pillars around this landing that stand on black bases. When set up with furniture, the room had two beautiful black cabinets and a lovely modern black coffee table. I wanted to incorporate this black accent color into the floors for continuity in the design, so I planned on giving the floors a black-painted border. With all that in mind, we could begin the restoration process.

Restoring the Wood

We were happy with the color of the wood and didn’t want to stain it again, so the first step to the restoration process was buffing the floors to prepare them for a wood finish. Buffing is basically where you remove the very thin top layer of wood finish previously laid down, thereby also removing any built-up dust or grime. This process is similar to very fine sanding. My contractors used an industrial floor buffer for the main floor and hand-buffed the stairs. After that, we measured a 4-inch border around the edges of the room, taking our time and being very precise – it wouldn’t work unless it was neat. 

Once the wood was prepped, we laid down a water-based satin wood finish to give the wood that glossy sheen. A water-based satin finish is a great choice for a living space because it is scuff-resistant and easy to clean. The wood is looking really beautiful already!

Finishing Touches

After the wood was restored, the only job left was to paint the black border around the room. Using tape for precision, we took our time with this step ensuring that it was perfect. Once the wood finish and the paint were dry, the floor transformation was complete. We moved all the furniture back into the room, and what an incredible difference the floors have made! The surprise of the beautiful wooden floors below the original carpeting gave way to such a magnificent finished design. The wooden floors make the entire room feel so much warmer. I absolutely love how the black border turned out and more importantly, my client loved it too. All that is missing from this beautiful living room is a nice area rug for the sofas.

Interested in renovating?

If you have outdated wall-to-wall carpeting, it’s time to consider renovating. Changing the floors goes to show that sometimes you don’t need a million changes to transform a room. Oftentimes one key change can make the biggest difference. However, working on floors is always a laborious task because you often need to be on your hands and knees to complete the work. Let me and my team of highly skilled contractors and craftsmen help you! Visit our services page to book your free consultation today.


A Breakdown of My Home Office Design

My home office is one of my favorite rooms in the house. It’s where I do most of my design planning and liaising with clients. I love the work I do, so it’s important for me to have a space to focus and get everything done! Keep reading to learn about how I designed it and what materials I used.

The Layout

The first step I tackled was how I wanted to layout my home office. Because my work is creative, it was crucial that my office catered to that. I wanted it to be a relatively large open space so that I could lay fabrics and create boards with plenty of floor space. For this reason, I kept the majority of the furniture up against the walls to make the space as big as possible. The size also allows me to lay some samples out and view them from afar to get a better idea of the designs I create. I also have a lot of fabric samples and materials that I use, so I custom-designed a large built-in unit with plenty of shelf and storage space. It extends from the door, into the left corner, and all the way to the back wall. This way all of my materials are organized and easy to access while I’m working. I’m not the tallest person in the world, so I added in a small and stylish step stool to reach the higher shelves.

Because I’ve built my business up from scratch, it made sense to have two separate desks to accommodate both my creative designing and business running. One of my desks is where I keep my computer and printer and do all my administrative work. The other desk is where I do more of my creative work, looking at samples, and drawing up designs. Having two separate desks helps me switch from a business mindset to a creative mindset easily. I decided to also add in a settee to take breaks, meetings, and calls, as well as an armchair for when I need a slight change of scenery or when someone is visiting my office. 

The colors

It was important to me that my office was a relatively neutral room that would allow plenty of space for creativity and inspiration. For this reason, I decided on a neutral color for the walls, bookcase, floors, and desk. Rather than painting, I decided to upholster the walls for a cozier and better-insulated space. I upholstered the walls and the desk skirts with a taupe linen fabric from Pindler. I then painted the wall-to-wall built-in unit with a Farrow & Ball color called String. I really liked the subtle contrast it provided with the taupe linen walls, to have some dimension and make the space appear larger. I chose simple dark wood flooring and a neutral trim.

If you’ve been following my work for awhile, you know that I absolutely love red. It’s bold, energizing, and passionate. I knew I needed a neutral space, but if it was too neutral, I wouldn’t want to spend any time there. So I upholstered my two office chairs and my settee in a beautiful red and black striped fabric from a British brand called Hodsoll McKenzie. I love the pop of color it provides! I also love the design of my desk chairs: the perfect combination of a comfortable armchair and a traditional office chair. It’s incredibly comfortable and cozy but is mounted on wheels for swiveling and ease. If your job requires you to sit at a desk for a while, I definitely recommend these! I upholstered the other chair in a red and tan leopard spot fabric from Rose Cummings. I added a few more splashes of red like the red tones in the step stool, as well as my Georgia Bulldogs pennant and art! 

Finishing Touches

To finish the room off I added a few orchid plants, which is one of my favorite flowers to decorate with. There’s one on my bookcase and one on my desk. I added in a fun zebra skin rug to tie the space together, as well as a beige throw pillow and wicker baskets for extra storage. I put one of my favorite paintings of a cheetah above the settee for some inspiration. Last but not least, I added a picture of my beloved dog Dunkin on my desk to keep me company throughout the day! I opted for a glass door so the space didn’t feel too closed off, as there are only a few small windows in this room.

More inspiration

Overall, I am super happy with how my home office has turned out, and it’s been serving me and my work well. I can’t recommend enough investing in your home office space for prime productivity and efficiency! Check out my other articles on home office design:

Designing your home office: Tips, Ideas, & Inspiration

The Three Best Lighting Types for Your Home Office

Designing Your Home Office: Window Treatments

Designing Your Home Office: The Perfect Paint Color


Closet Design – Tips & Ideas

Having a beautifully designed and smartly organized closet is key to stress-free mornings. There is nothing worse than your closet being full of dirty and disorganized laundry when you need to get ready quickly or you have a busy day ahead. You should be able to walk into your closet and know exactly where everything is. That’s why customizing your closet to be organized in a way that makes sense for you is so important! Keep reading for 6 tips and ideas for your closet design and organization.

Decide how you would like to organize your clothes

There are many ways to organize clothing and accessories so it’s important to look at different options and settle on one that makes the most sense for your lifestyle. Some people like to organize their closet based on clothing items. For instance, all the pants are in one section, all the tops are in another sorted by sleeve length, etc. Others may have a variety of clothes for different occasions and may find that separating their clothes based on what they’re used for works the best for them. For instance, you may choose to categorize your closet into work clothes, activewear, casual clothes, and pajamas. Some people prefer to have one section with their most worn items and the rest of the clothes separated into categories. Some like to organize their clothing by color for a beautiful and satisfying look.

There’s a good chance that combining a few of these techniques will work best for you. The next time you get ready, pay attention to what would make that process easier and go from there to find a method that works for you.

Add a chair or seating area

When I remodel and design closets, I love adding a chair or seating area if space allows it. It feels luxurious to be able to get ready slowly and enjoy the process. It also means that if you want help deciding what to wear, someone would be able to sit comfortably in the closet with you to help. I always recommend adding a chair/seating area for people with children or with a busy lifestyle. It gives them their own kid-free space to unwind and relax. Having a space in the house that is yours massively helps reduce stress. For a lot of parents and busy professionals, getting ready is the one time of day that they get to themselves. Might as well go all out and allocate some space for this to happen in your closet!

Use an assortment of storage types

Get creative with what type of storage you use and use a variety to accommodate your specific needs. For instance, if you wear a lot of suits or dresses, prioritize space for hangers. If you own a lot of shoes or bags, be sure to have plenty of shelves. Get different-sized drawers for different items. For instance, we remodeled a small closet for a client who had a massive earring collection. We built her a set of custom drawers, including three smaller drawers lined with velvet to store her earrings. Another type of storage that people often forget about utilizing in the closet are cabinets! Cabinets are a great way to add in shelving without having too many items directly on display. For the same client, we built individual glass compartments in a cabinet style to house her shoes, which can be seen on the right side of the image.

Add Decor

This is the time to get creative! When decorating a house, people often forget about their closets! I like to think of decor in the closet as a gift to yourself. Chances are not many of your guests will be venturing in your closet, but that doesn’t mean it shouldn’t be a beautiful space for you to be in. Your closet is a great space to add decor that doesn’t fit with the rest of your house’s design or that has a lot of sentimental value.

One idea is getting artwork that features a quote that motivates you personally. That way, while you’re getting ready in the morning there is a little message there to get you feeling confident for the day!

Consult a Professional

If your closet is disorganized and you’re feeling a little overwhelmed at the prospect of tackling it yourself, we completely understand. It takes a long time and if you don’t already have proper storage in place, it becomes a massive project. But that’s where a professional designer or organizer can help you out. At Kelley Astore Interiors, we work with our clients to create customized designs to suit their needs. We specialize in bespoke cabinetry and built-in units so will be able to create the perfect space for you, whether you have a lot of shoes, a lot of earrings, or not a lot of space at all!

Our goal is to take all the stress out of the design process for our clients. Whatever the nature and scope of your redesign, we take full responsibility for seeing that the entire project is finished on time and on budget and that all work is of the highest quality. Head to our services page to book a free consultation today!


Kelley Astore Interiors

Expert Interior Design & Renovation Services of Every Style.

Where We Work

Northern Virginia, Washington, DC,
and the Greater Washington Area

GET IN TOUCH
Connect

Privacy Settings
We use cookies to enhance your experience while using our website. If you are using our Services via a browser you can restrict, block or remove cookies through your web browser settings. We also use content and scripts from third parties that may use tracking technologies. You can selectively provide your consent below to allow such third party embeds. For complete information about the cookies we use, data we collect and how we process them, please check our Privacy Policy
Youtube
Consent to display content from Youtube
Vimeo
Consent to display content from Vimeo
Google Maps
Consent to display content from Google
Call Now ButtonCall Us For A Quote!