Installing a Beadboard Ceiling
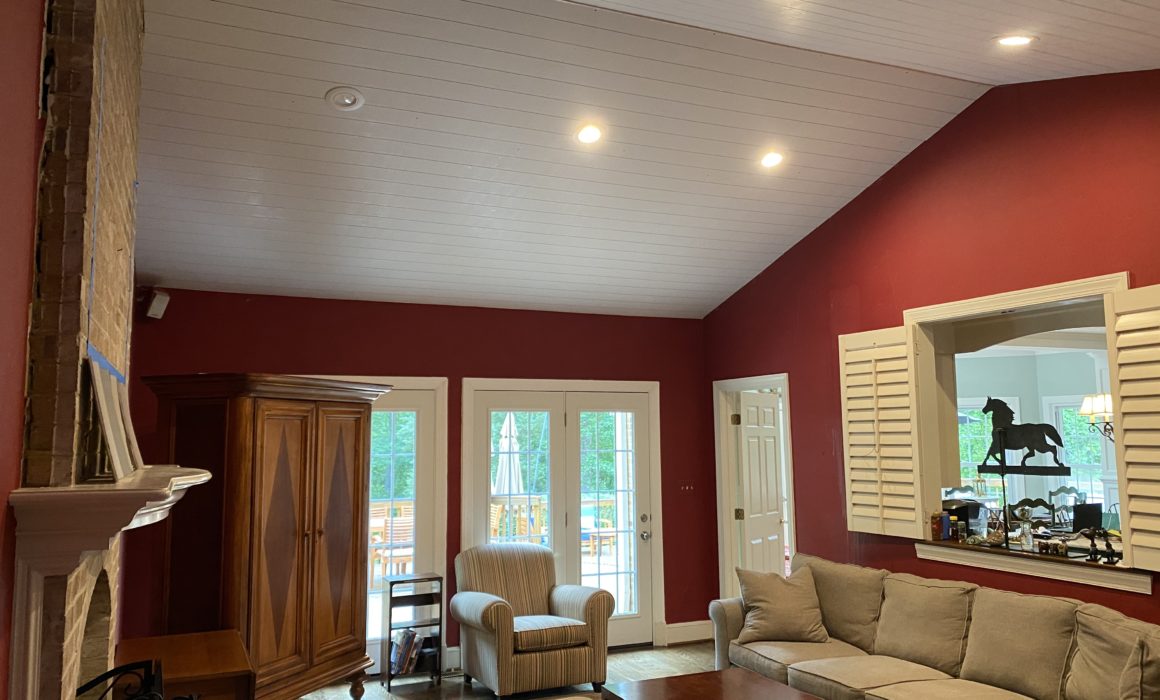
Interior design is all about the dimensions and texture of a space. Often, it’s the finer details that make the biggest difference to a design. My job is to find where these details can be added to create those dimensions. I am currently working with a client in Reston, Virginia to remodel their living room. It is a beautiful space with loads of potential. One of the most striking aspects of the room is its shape: specifically the cathedral ceilings that reach 20 feet high. I wanted to highlight these beautiful high ceilings without distracting from the living room’s other key features, like the fireplace.
With that in mind, my client and I agreed on installing a beadboard ceiling: the perfect way to add that extra dimension and texture!
What is beadboard?
Beadboard or beadboard paneling refers to lining up equal-sized planks of wood vertically or horizontally to cover a surface. It is frequently used on walls, covering the bottom half or even the full length. It adds that extra texture for the eye to land on, but it remains subtle. Depending on how you install and style beadboard paneling, it can be elegant, natural, rustic, classy, or all of the above.
We decided to install the paneling to run horizontally. This will help the room appear a bit wider than it actually is. Keep reading to find out how we installed the beadboard ceiling and how it ended up!
Prepping
Like any design project, the first step was to prep the space and the materials. Because the ceilings are 20 feet high and the panels are so long, we knew that simple ladders would not be enough to install the beadboard. We opted for scaffolding instead. However, that meant that the very first step for our team was to completely remove all the furniture from the living room and into the garage to make space for the scaffolding. Once we cleared the room, we set up our scaffolding and got to work preparing the materials.
As usual, my team and I measured and cut the boards on site. Thankfully, my client’s garage was large enough for us to prepare the panels. You can see in this photo that it took two people to cut these boards because they were so long! We also had to cut special beadboard panels to fit around the lights in the ceiling. This would’ve been difficult to do if we weren’t able to do it on site.
The last step we took to prepare for the installation was removing the existing molding around the top of the brick fireplace. Once that was done, we were ready to begin installing the ceiling!
The installation
A project like this requires many hands-on board to ensure that it is done efficiently and more importantly, safely. We were essentially hanging up long heavy wooden planks from 20 feet high. Needless to say, safety was a priority. For this reason, I made sure that a few people on my team were there throughout the installation to help prop the boards up as they were secured into place.
For ease, we decided to use a nail gun to fix the beadboard panels. We started with the outside edge of the wall and moved inwards and upwards to the center. Once one side was done, we repeated the same process on the other side. This was a tedious and laborious task, but my team of contractors are amazing and were able to get the job done very efficiently!
Future plans
I absolutely love how the beadboard ceiling installation turned out. But the design is far from finished. The ceiling boards now need to be caulked and painted, but we won’t be able to do that until we tackle the rest of the room. We are planning to install two built-in bookcases on either side of the fireplace and redo the mantle. The blue tape in the image is where a TV will eventually go up. After that, some fresh coats of paint will bring the design together and my clients will be able to enjoy their new living room.
If you want to stay updated on how the rest of this renovation goes, be sure to follow us on Instagram, Facebook, LinkedIn, or Pinterest! If you’re interested in renovating your home, visit our services page to book your free consultation today!

