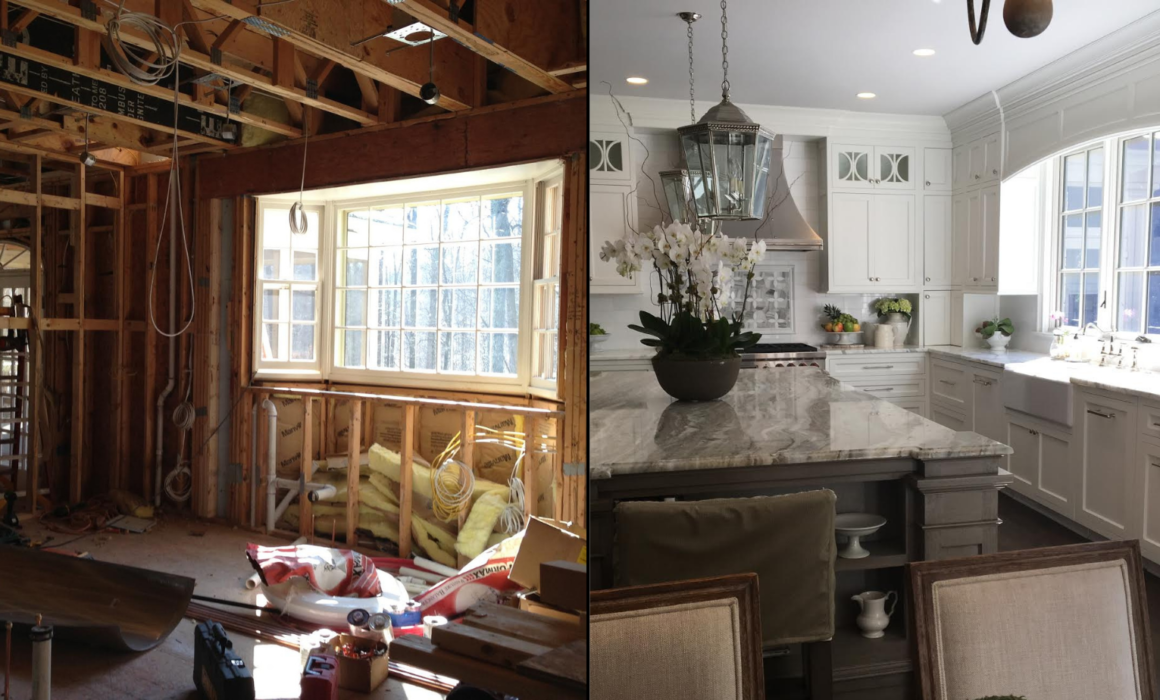
Bespoke Kitchen Before and After

Kitchens are one of my favorite spots in the house to renovate. I always see the kitchen like the heart of a house – a place where the family gathers – a neutral ground. Having a beautiful large space to prepare and enjoy food supports a healthy relationship between cooking and eating. So I’m happy to bring you through the before and after renovation of a kitchen in Great Falls, Virginia

Getting Started

If you’ve been following our blogs for a while, you’ll know that our favorite way to go about renovations is starting completely fresh. So we gutted the entire existing kitchen, which means that everything in this renovation is completely bespoke and custom made. Looking at the raw space, you can see that it’s a fairly large space – nothing too extravagant, but also not too small by any means. The space has large windows that let in beautiful natural daylight, and I knew that I wanted this design to accentuate that. Having a completely gutted room is like having a blank canvas. The possibilities are endless and your imagination is free to run wild. Which is what we did.

Planning The Design

The first step in any design process will be planning. We knew that we wanted the kitchen to follow a neutral color palette, and we also wanted it to feature marble. Thankfully we found two different types of marble. The first one was very veiny marble that features a lot of sandy, gray, and white tones. This marble would eventually become the kitchen island. As for the rest of the countertops, we went with a more subdued marble that was less veiny. It was perfect for what we had in mind. After we chose which marble to use, we could plan the rest of the design around that. 

Custom Cabinets 

The first thing we tackled were the custom cabinets. We started by installing the hanging cabinets along the walls first. Afterwards we installed the lower cabinets, the kitchen island, and the pantry. All of the cabinetry had to be installed around where the kitchen appliances would eventually go. The island was built in different segments before being topped with marble. When designing the island, we made sure to build in shelves, drawers, and cupboard space for extra storage. It is so extremely important that a kitchen is designed to be practical and functional because everyone in the family spends so much time in the kitchen.

To provide contrast, we went with two different colors of paint/stain for all the custom cabinetry. For all of the cabinetry along the walls, we opted for a pale gray stain color. As previously stated, we wanted to accentuate the natural light from the window, so featuring plenty of this light color would really help brighten the room up. We decided to introduce contrast in order to balance the design. We did this by choosing a darker gray/green stain for the island. I love the way it turned out.

Lighting & Appliances

Next on our list were all the kitchen appliances. We installed the sinks, stove, oven, and other appliances. The vent-a-hood above the stove is a stainless custom design. We installed the marble backsplash and the custom-designed marble piece above the stove to offer some texture for the eye to land on. Finally, we installed beautifully polished nickel lanterns hanging over the island from Vaughan Designs. We attached polished nickel hardware to all the cabinetry, then put the bespoke custom-made barstools around the island and the design was nearly complete! All that was left to do was decorate the countertop with beautiful vintage English Ironstone pieces. 

More where this came from…

I absolutely love how this design turned out and my client loved it just as much. It feels modern, clean, chic, and welcoming! If you are debating whether or not to renovate, check out our article on the perks of a kitchen renovation to help you decide! 


Fabulous Find Underneath Wall to Wall Carpeting

Today we are back in Great Falls, Virginia, working with a client to remodel their living room. When I saw the space, I instantly felt that the wall-to-wall carpeting was outdated and needed to go. Wall-to-Wall carpeting can sometimes work, but in most cases, it makes the room seem smaller. Not to mention that wall-to-wall carpeting traps a lot of dust, which is no good for anyone with allergies. The other issue with wall-to-wall carpeting is that it makes it more difficult to split the room up into sections, whereas using rugs allows the floor to be divided up. 

All this to say that the wall-to-wall carpeting needed to go. Keep reading to find out how this first step led to the transformation of this living room floor. 

Tearing Up The Carpeting

My lovely contractors and I got to work tearing up the old carpet. It had been installed in sections, so we began removing each carpet piece, the padding, and the tack strips. And guess what we found?! The most beautiful hardwood floors that I knew would look stunning with a bit of TLC. The wood was in great condition and just needed a little restoration and detail work. I was relieved to see this because when removing the carpet you don’t always know what you’re going to find underneath. Oftentimes, it reveals damaged or molding floorboards. We were all so delighted to find the beautiful woodwork.

Preparing the Design

As soon as my client and I saw the beautiful wood floor, we knew it was going to stay. But I knew some detail work would take this from a nice living room to a stunning living room. The living room is two steps down from a landing that features black marble. There are pillars around this landing that stand on black bases. When set up with furniture, the room had two beautiful black cabinets and a lovely modern black coffee table. I wanted to incorporate this black accent color into the floors for continuity in the design, so I planned on giving the floors a black-painted border. With all that in mind, we could begin the restoration process.

Restoring the Wood

We were happy with the color of the wood and didn’t want to stain it again, so the first step to the restoration process was buffing the floors to prepare them for a wood finish. Buffing is basically where you remove the very thin top layer of wood finish previously laid down, thereby also removing any built-up dust or grime. This process is similar to very fine sanding. My contractors used an industrial floor buffer for the main floor and hand-buffed the stairs. After that, we measured a 4-inch border around the edges of the room, taking our time and being very precise – it wouldn’t work unless it was neat. 

Once the wood was prepped, we laid down a water-based satin wood finish to give the wood that glossy sheen. A water-based satin finish is a great choice for a living space because it is scuff-resistant and easy to clean. The wood is looking really beautiful already!

Finishing Touches

After the wood was restored, the only job left was to paint the black border around the room. Using tape for precision, we took our time with this step ensuring that it was perfect. Once the wood finish and the paint were dry, the floor transformation was complete. We moved all the furniture back into the room, and what an incredible difference the floors have made! The surprise of the beautiful wooden floors below the original carpeting gave way to such a magnificent finished design. The wooden floors make the entire room feel so much warmer. I absolutely love how the black border turned out and more importantly, my client loved it too. All that is missing from this beautiful living room is a nice area rug for the sofas.

Interested in renovating?

If you have outdated wall-to-wall carpeting, it’s time to consider renovating. Changing the floors goes to show that sometimes you don’t need a million changes to transform a room. Oftentimes one key change can make the biggest difference. However, working on floors is always a laborious task because you often need to be on your hands and knees to complete the work. Let me and my team of highly skilled contractors and craftsmen help you! Visit our services page to book your free consultation today.


Installing a Beadboard Ceiling

Interior design is all about the dimensions and texture of a space. Often, it’s the finer details that make the biggest difference to a design. My job is to find where these details can be added to create those dimensions. I am currently working with a client in Reston, Virginia to remodel their living room. It is a beautiful space with loads of potential. One of the most striking aspects of the room is its shape: specifically the cathedral ceilings that reach 20 feet high. I wanted to highlight these beautiful high ceilings without distracting from the living room’s other key features, like the fireplace. 

With that in mind, my client and I agreed on installing a beadboard ceiling: the perfect way to add that extra dimension and texture!

What is beadboard?

Beadboard or beadboard paneling refers to lining up equal-sized planks of wood vertically or horizontally to cover a surface. It is frequently used on walls, covering the bottom half or even the full length. It adds that extra texture for the eye to land on, but it remains subtle. Depending on how you install and style beadboard paneling, it can be elegant, natural, rustic, classy, or all of the above.

We decided to install the paneling to run horizontally. This will help the room appear a bit wider than it actually is. Keep reading to find out how we installed the beadboard ceiling and how it ended up!

Prepping

Like any design project, the first step was to prep the space and the materials. Because the ceilings are 20 feet high and the panels are so long, we knew that simple ladders would not be enough to install the beadboard. We opted for scaffolding instead. However, that meant that the very first step for our team was to completely remove all the furniture from the living room and into the garage to make space for the scaffolding. Once we cleared the room, we set up our scaffolding and got to work preparing the materials. 

As usual, my team and I measured and cut the boards on site. Thankfully, my client’s garage was large enough for us to prepare the panels. You can see in this photo that it took two people to cut these boards because they were so long! We also had to cut special beadboard panels to fit around the lights in the ceiling. This would’ve been difficult to do if we weren’t able to do it on site. 

The last step we took to prepare for the installation was removing the existing molding around the top of the brick fireplace. Once that was done, we were ready to begin installing the ceiling!

The installation

A project like this requires many hands-on board to ensure that it is done efficiently and more importantly, safely. We were essentially hanging up long heavy wooden planks from 20 feet high. Needless to say, safety was a priority. For this reason, I made sure that a few people on my team were there throughout the installation to help prop the boards up as they were secured into place.

For ease, we decided to use a nail gun to fix the beadboard panels. We started with the outside edge of the wall and moved inwards and upwards to the center. Once one side was done, we repeated the same process on the other side. This was a tedious and laborious task, but my team of contractors are amazing and were able to get the job done very efficiently!

Future plans

I absolutely love how the beadboard ceiling installation turned out. But the design is far from finished. The ceiling boards now need to be caulked and painted, but we won’t be able to do that until we tackle the rest of the room. We are planning to install two built-in bookcases on either side of the fireplace and redo the mantle. The blue tape in the image is where a TV will eventually go up. After that, some fresh coats of paint will bring the design together and my clients will be able to enjoy their new living room.

If you want to stay updated on how the rest of this renovation goes, be sure to follow us on Instagram, Facebook, LinkedIn, or Pinterest! If you’re interested in renovating your home, visit our services page to book your free consultation today!


Kelley Astore Interiors

Expert Interior Design & Renovation Services of Every Style.

Where We Work

Northern Virginia, Washington, DC,
and the Greater Washington Area

GET IN TOUCH
Connect

Privacy Settings
We use cookies to enhance your experience while using our website. If you are using our Services via a browser you can restrict, block or remove cookies through your web browser settings. We also use content and scripts from third parties that may use tracking technologies. You can selectively provide your consent below to allow such third party embeds. For complete information about the cookies we use, data we collect and how we process them, please check our Privacy Policy
Youtube
Consent to display content from Youtube
Vimeo
Consent to display content from Vimeo
Google Maps
Consent to display content from Google
Call Now ButtonCall Us For A Quote!