Shop The Look: Bringing My Dream Master Bathroom To Life

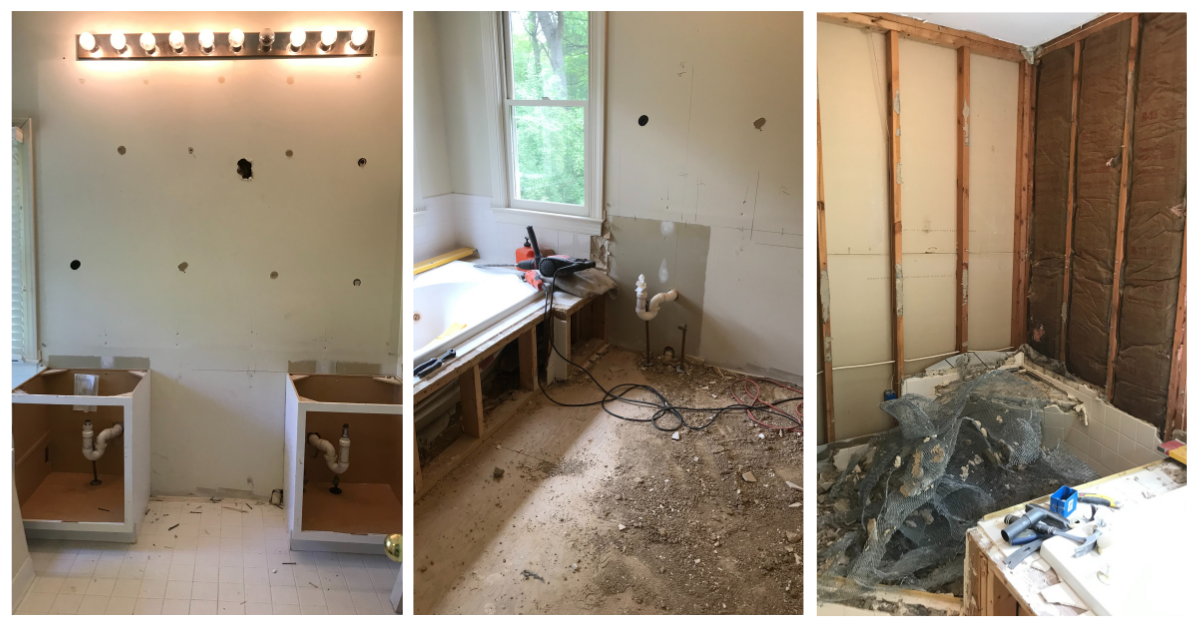
After years of designing luxury bathrooms for my clients – I decided it was time to bring my dreams to life and start working on my own Master Bathroom. And, now that this exciting project has come to completion, I thought I’d share the finished product with you so that you can shop the look and perhaps even emulate this within your own home! 

The Flooring. 

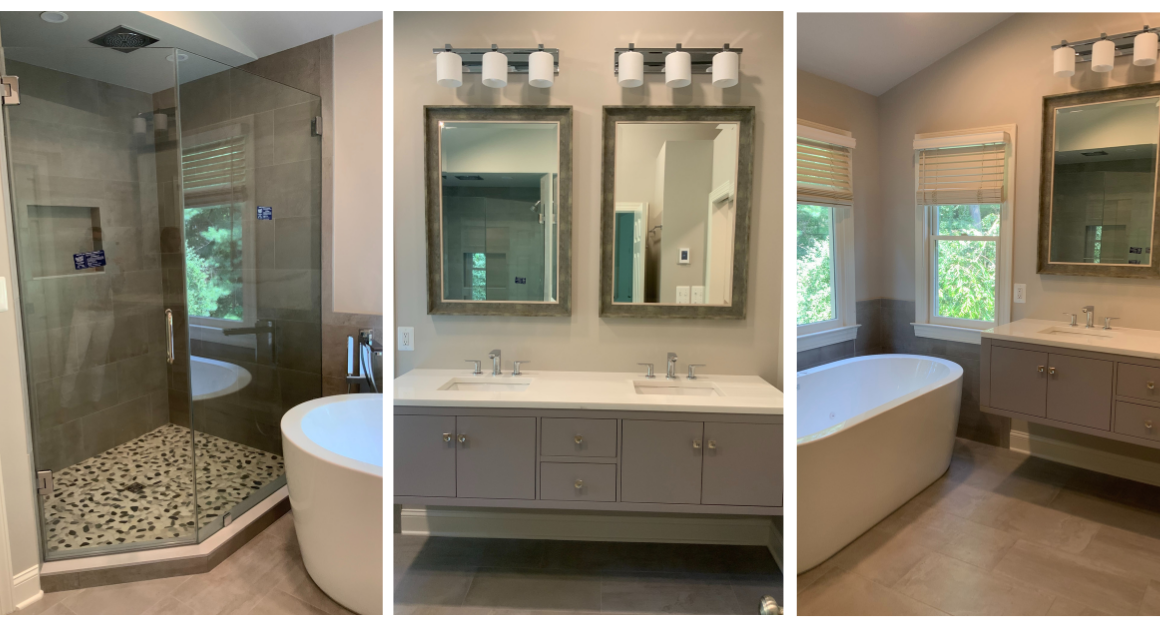
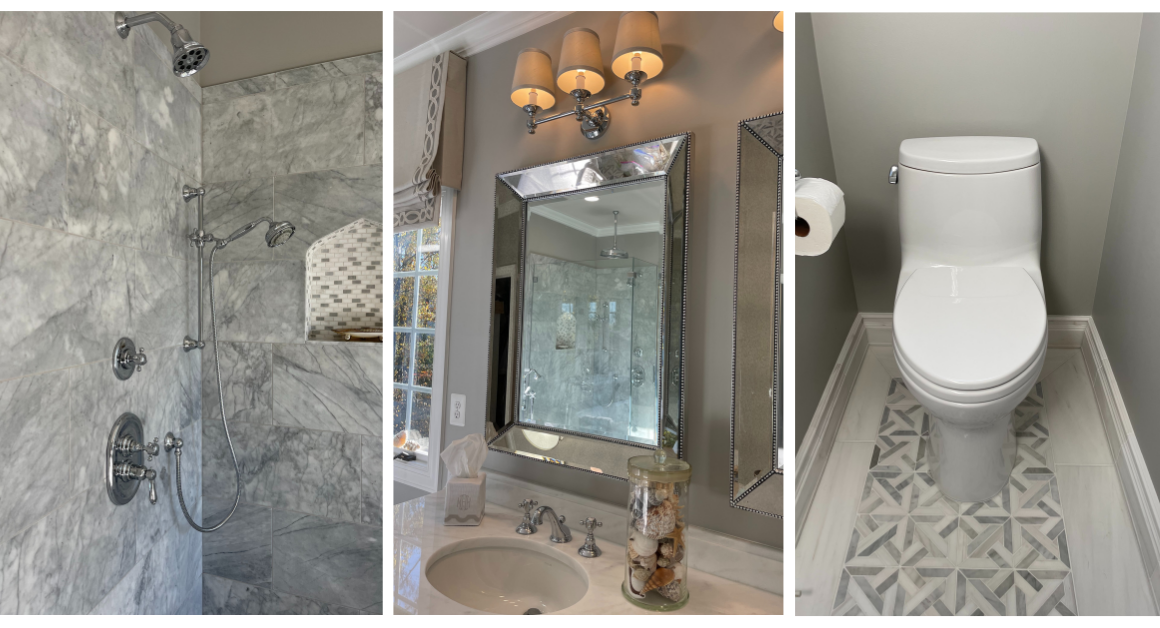
When designing my bathroom, I wanted to create a space that felt bright, open, and, most importantly, clean. Therefore, I decided to opt for a simplistic and neutral color scheme, which would also help me create a sense of luxury in my bathroom. To kickstart this color scheme and design, I opted for patterned marble flooring from Marble Systems. Here, the mix of grey and white is nicely complemented by a snow-white border and marble baseboard – giving the space a distinctive, luxury feel. 

The Walls. 

I believe that the bathroom is one of the best rooms in the house to experiment in when it comes to your design choices. However, having already chosen statement flooring, I wanted to go with something simple and stylish when it came to the walls. In the end, I chose a pale gray shade called Pavillion Gray from Farrow & Ball, which helps tie the entire room together. In keeping with the theme, I also purchased mirrors and vanity lights from Restoration Hardware. Initially, the vanity lights came with white silk shades – but I decided to cover them with pale gray silk instead so that they blended in nicely with the rest of the room. 

While making the most of natural light is a great way to breathe life into your home, you’re going to want some privacy in the bathroom. Therefore, I installed some gorgeous Roman Shades in a pale gray linen from Pindler. The embroidered tape is from Samuel & Sons.

The Vanity.  

A good bathroom needs a good vanity – whether you are checking your reflection before heading out to an important meeting or simply brushing your teeth. However, when I couldn’t find exactly what I was looking for when shopping around, I decided to design my own vanity. The vanity is painted in the shade China White from Benjamin Moore, with a white marble finish from Marble Systems. Here, the marble and wood blend together seamlessly for a luxury finish. The vanity features lots of storage space with stunning polished chrome hardware for a little extra sparkle and shine. 

The Bathtub & Shower. 

If you are looking to make a statement (or a splash) in your bathroom – then I’d recommend going all out when it comes to choosing a bathtub and shower. When redesigning this space, I purchased the shower, tub faucet, and vanity faucet from the House of Rohl, all of which are finished with polished chrome for a clean, sparkling finish. The bathtub features a faucet and handheld unit, while the shower features a rainfall showerhead, a main showerhead, and another handheld unit. Other plumbing fixtures within the bathroom, such as the toilet itself, were purchased from Toto USA.

If you’re looking to transform your bathroom but aren’t sure where to start, please do not hesitate to get in touch today. Whether you’re looking for inspiration or a complete remodeling – we’re on hand to bring your dreams to life.


Before and After Transformation: Master Bathroom

The bathroom is where you begin and end the day – it’s important that it’s a space where you can feel clean and calm. Personally, I believe that the best bathrooms are ones that feel open and airy, full of light, to start the day with a feeling of a fresh start. Likewise, it’s important that the lighting fixtures are appropriate for a nice atmosphere in the evenings before bed. That’s why this week we’re bringing you a master bathroom transformation – to show you just what a difference design can make!

The Before

The original bathroom was alright. There was nothing wrong with it, so to say. But it was all one-dimensional. Nothing about this bathroom excited me. I really did not like the way that the drapery fell over the windows – there was too much fabric and the color did not really match the general atmosphere. The built-in bathtub was very large, giving a feeling of luxury – but it wasted a lot of space and made the entire bathroom feel smaller. The warm lights combined with the pale yellow wall color made the whole room feel yellow – which is not the ideal color for a bathroom if you ask me. Something about the color scheme made everything feel outdated. One look at this bathroom and I knew that a drastic transformation could take place – and it would be one that would be worth it.

The Design & Process

When first designing this bathroom, I knew I wanted to opt for a more neutral color scheme, focusing on whites and greys – this would look beautiful with natural lighting and feel very clean. To begin, we painted the walls in Farrow & Ball Pavillion Gray #242 as our starting point. The next thing we wanted to tackle were the floors. The bathroom is one of my favorite places to experiment with tiles, because there are so many areas where tiles are appropriate – on the floors, around the shower, etc. I chose an array of tiles for the floor, the shower, and some detail work. I wanted to play with different patterns, to ensure the final design had a lot of texture and dimension, unlike the original. 

Additionally, I wanted to ensure that the whole design featured lots of little details – this would help keep the eye fluttering across the room, while still holding true to a simple and clean design. One of the areas I was able to achieve this was in the shower. I chose a classic white and grey marble tile for the majority of the shower walls. But I wanted to create a little arched wall niche in the shower – the perfect place for soaps and toiletries. This little alcove was such a great opportunity to get patterned tiles in, this time in mosaic, the same as the shower floor. My contractors did a fantastic job creating this arch – truly only a real stone craftsman can produce something this perfect, because it involves cutting and shaping all of the stone/tile manually. I’m always so grateful to have the best team!

I also managed to get a lovely texture incorporated into the custom vanity we had built for this bathroom. I love the diamond shapes in the doors and the way that the drawers are installed – slightly unconventionally. I think there’s little more luxurious than having two bathroom sinks, so that’s what we opted for. We chose to have a freestanding tub to create more floor space and open the bathroom up – additionally, we opted for glass shower doors rather than curtains to keep the space feeling airy. 

We sourced the mirrors and vanity lights from Restoration Hardware, with the vanity lamp shades custom made in my workroom in gray silk by Fabricut. To really tie the entire design together, we chose to use roman shades which really elevates a room. We used linen from Pindler & Pindler and hand-embroidered decorative tape from Samuel & Sons to tie all the patterns together. Unlike the previous shades, I made sure that these were not bulky, but rather lay flat. Lastly, we installed a toilet from Toto (my favorite place to source toilets) and had chrome hardware installed to match the metallic of the mirrors. All of the plumbing supplies, faucets, and fittings were from Rohl in polished chrome.

The Finished Bathroom

I am incredibly proud of how this bathroom turned out. I think it feels elevated, clean, luxurious, and bright…truly the best place to start and end each day. I think the two bathrooms are so radically different, you may not even tell that they were once the same bathroom!

If you are interested in renovating a bathroom in your house – let us help you! Head to our services page to book your free consultation today. 


Modern Master Bathroom Renovation

The bathroom is where you start and end your day. It’s where you get clean, get ready for the day, and wash up before bed. If a bathroom looks worn down, it may not feel clean even if it is. Because of this, it’s important that it reflects the way you’d like to feel. At Kelley Astore Interiors, we renovate and design luxurious bathrooms to create havens for our clients to prepare to take on the world. Today we’ll be taking you through a modern master bathroom renovation we recently did for a client to give you ideas and inspiration, and to show you what a difference a renovation can make!

The client we were working with is a full-time business owner and parent and wanted to renovate several rooms in their house. We always manage projects from start to finish to take the stress out of the renovations for our clients.

“Being a busy business owner & parent of 3 kids, I knew I wanted a beautiful house & home office but didn’t know where I’d find the time & energy to manage all the updates. Kelley & her team were fantastic. From color patterns & lighting to new flooring & bathrooms, our house now has a beautiful, functional look & feel we will all love for years to come. I’m so appreciative Kelley was able to manage it all from start to finish so I could focus on clients & family.”

– S.H. Vienna, Virginia.

Strictly speaking there wasn’t anything wrong with the master bathroom as it was. It had nice gold detailing, a luxurious bathtub, and a large shower. It felt bright and airy. However, it was almost entirely white which left it feeling a bit like a hospital and a bit plain. The white tiling started showing some wear. The cabinetry was a bit clunky and painted white which felt a little boring. Additionally, the frosted glass around the shower and the large borders around the built-in tub made the bathroom seem much smaller than it was. Lastly, there was one massive mirror above the sinks and another one mounted to the wall beside it. Having so much mirror meant that everything in the bathroom was reflecting off itself resulting in a cluttered feeling.

Master Bathroom – Before

As soon as I first saw it, I started to envision all the ways we could transform it into a luxurious modern bathroom. The plan was to keep the general location of where the sinks, cabinets, tub, and shower would go, but update everything. Most importantly, we would play with more textures and colors to add dimension and elegance to the bathroom.

The first step was to totally gut the entire bathroom to its bones to allow us to start from scratch. The contractors got to work demolishing the cabinetry and shower, removing the tub, sinks, and mirrors, and taking out the tiles and light fixtures. Meanwhile, the client and I got to work choosing and planning the changes for the bathroom. We made some decisions, including featuring a free-standing tub, and headed to the stores to take in all our options.

Once everything was gutted and all the materials and fixtures were chosen, all that was left was fitting everything. My contractors and I got to work to create the modern bathroom of my client’s dreams. We installed new larger stone tiles all around, including in the shower walls and around the bathtub. Unlike the plain square tiles previously installed that were uniform, each stone tile had a very subtle veining. Even that small detail gave so much texture. The new tiles had a smaller seam which meant the whole floor and shower looked smoother and cleaner.

Next, we installed a beautiful floating vanity. The floating vanity really opened up the room with the empty space beneath it and on either side of it. We painted it a pale gray to compliment the color of the tiles. Nothing feels more luxurious than marble, so we topped the vanity with white marble. We installed two mirrors with a textured dark gray border that paired well with the tone of the vanity and tiles. We added new modern faucets and lights above each mirror. We kept the trim of the bathroom white to provide contrast and had the walls painted a neutral pale color.

We then replaced the tub with a free-standing whirlpool tub. Similar to the vanity, having the tub unattached to the walls gave the whole room so much more space and made it feel so much more luxurious. Lastly, we tackled the shower. Because we were opting for transparent glass doors, it was important the shower still had a clear separation from the rest of the bathroom. Because of this, we chose a fun mosaic for the shower floor and I absolutely love it! With the white, black, and gray tones, it does such a good job of tying the rest of the room and colors together. We installed a new rainfall showerhead coming out of the ceiling to get rid of clunky shower pipes and further open up the bathroom

Overall this was a super fun and successful modern bathroom renovation! I am so pleased with the results and even more happy that the client is pleased as well. If you’re interested in renovating, be sure to head to our services page to book a free consultation. Whatever the nature and scope of your redesign, we take full responsibility for seeing that the entire project is finished on time and on budget and that all work is of the highest quality. We take the worry out of the process for our clients!


Kelley Astore Interiors

Expert Interior Design & Renovation Services of Every Style.

Where We Work

Northern Virginia, Washington, DC,
and the Greater Washington Area

GET IN TOUCH
Connect

Privacy Settings
We use cookies to enhance your experience while using our website. If you are using our Services via a browser you can restrict, block or remove cookies through your web browser settings. We also use content and scripts from third parties that may use tracking technologies. You can selectively provide your consent below to allow such third party embeds. For complete information about the cookies we use, data we collect and how we process them, please check our Privacy Policy
Youtube
Consent to display content from Youtube
Vimeo
Consent to display content from Vimeo
Google Maps
Consent to display content from Google
Call Now ButtonCall Us For A Quote!