
Small Modern Bathroom Designed for Boys
We are back with another home renovation and this time we are moving to the bathroom – specifically a bathroom that will be used by two young boys. Design is all about the marriage of functionality and beauty. Whenever I design for kids, I make sure to spend extra time with the function of the design, as children have different and unique needs to be catered to. Keep reading to discover this incredible modern bathroom transformation for boys!
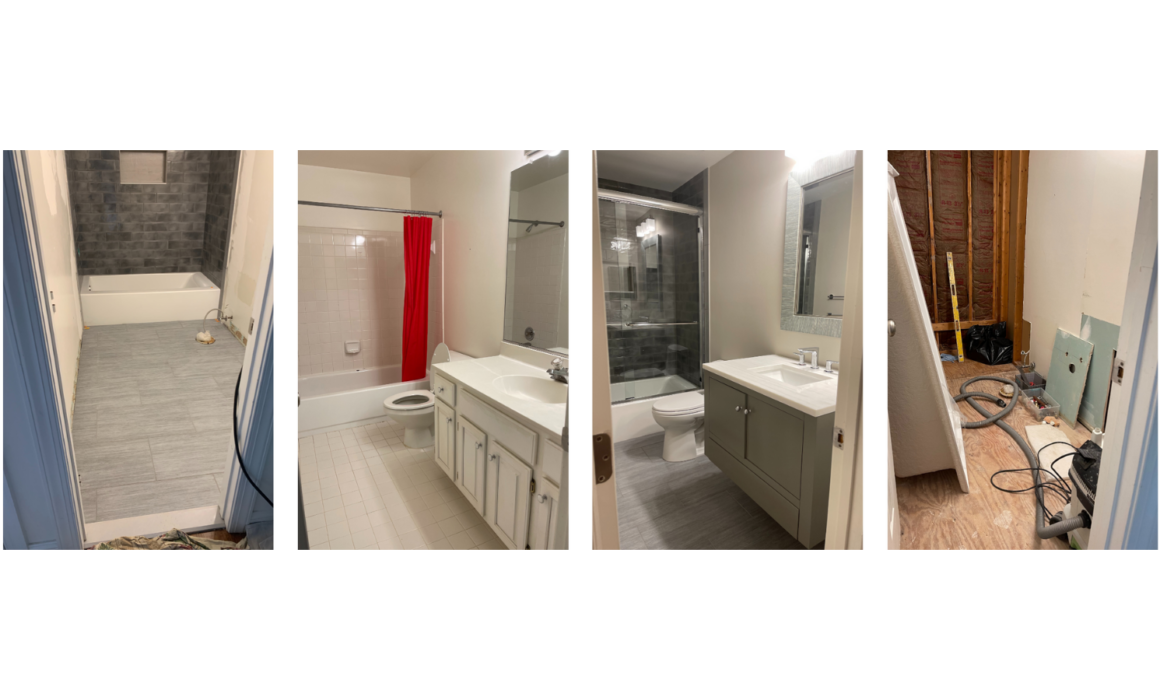
Before We Begin
When looking at the before photos, it’s clear that a lot of work needs to happen – especially aesthetically. Bathrooms are one of the areas of the house where, even if the entire room has been cleaned properly if it looks old or outdated, something about it doesn’t feel clean. Bathrooms are also really susceptible to water damage and mold, so it’s always a good idea to make sure nothing needs to be treated before beginning the actual design. For both of these reasons, we decided to gut the entire bathroom and start fresh – my preferred way of remodeling bathrooms.
My contractors and I got to work tearing out the old bathroom. Thankfully we didn’t find any terrible water damage, so this process was relatively quick and pain-free. Now is where the real fun begins.
Laying the groundwork
Because we cleared out the room down to it’s studs, we had to do some prep before the transformation could start. We installed cement boards on the walls before installing the tiling. This is important for a few reasons – it gives you the necessary flat surface needed to attach the tiles, and it protects the wood below from any possible water damage. Once those were up, we got to work tiling the bathroom and installing new floors. We kept the design relatively simple and neutral for practicality’s sake. Although young boys might find spiderman wallpaper more exciting, the client and I both agreed to keep it classy so that the boys don’t absolutely hate it as they get older. We chose a simple dark grey 4 x 12 tile for the shower/bath area to provide contrast with the wall color we would eventually use. The floors we chose are simple light gray large 12 x 24 tile. Choosing a large tile for the floor made the small bathroom seem that much larger.
The Shower
The plumbing is, without a doubt, the most important part of any bathroom. We decided to keep the same general layout of the original bathroom for ease, to avoid having to reinstall all the pipes. We started with installing a built-in bathtub with a shower to give the boys options. Next we replaced the original shower curtain with sliding shower doors. Shower doors mean no mildew, never having to change or replace the shower curtain, and a dryer bathroom. We also installed towel rods onto the shower doors so the boys would have no excuse not to hang their towel up!
The Toilet
Next we put in the new toilet. Because two children were going to be using this toilet, we chose one from Toto Toilet that has a special finish on it called Sani Gloss to help keep the bowl clean. Any parents out there will know how difficult it can be to get your children to help with the cleaning, so we felt this was the best and safest option. We chose a toilet that was simple and white.
The Vanity and Sink
All that was left to do plumbing wise was the sink! We knew we wanted to build a custom modern vanity for this room. The previous vanity was very large, making the rest of the bathroom feel very small. We decided to downsize and avoid the all-white look. So we built a vanity with a cabinet that floated on the wall, slightly above the floor. We chose a floating vanity to create the illusion of a larger space. It also makes cleaning easier, with the floor below the vanity accessible, avoiding trapped dust. We installed a beautiful light colored marble counter on top, with a large modern-sink.
All the plumbing fixtures in this bathroom were done with chrome. Chrome never ages, and looks great. Not only that, but it matches well with pretty much any other color and material. Practical and beautiful!
Finishing Touches
After all the plumbing and the vanity were installed, the most functional aspects of the bathroom had already been taken care of. Now it was just a matter of making it look beautiful. Keeping with the neutral theme, we painted the walls in Benjamin Moore #860 in Apparition, a classic and timeless shade. The vanity also used Benjamin Moore paint, this time in #168 HC Chelsea Gray. Similar in tone to the wall-paint, this darker shade offered a lovely contrast, acting as a bridge between the light colored walls and the dark shower tiles. Finally, we put up a mirror, smaller than the previous, with a simple grey and white striped pattern. We installed a light right above the mirror as a sophisticated detail.
Final Thoughts
I think the design turned out great, especially considering how practical it is for the two young boys who will be using it. I hope they enjoy their new bathroom now and as they grow up! For more articles on our bathroom renovations, check out our other articles. If you are interested in renovating a bathroom in your home, get in touch today!