Decorating for The Holidays: How to make a Holiday Arrangement Using Fresh Greens

The Holidays are back and we’re busy decorating for the season! Last year we provided a check-list for decorating with Fresh Greens: one of our favorite ways to decorate for the winter. This year, we’ve outlined a step-by-step guide on how to create your own arrangement using fresh greens. So put on some holiday tunes, grab your shears, and let’s get started!

Step One: Sourcing and Cutting Your Greens

The easiest place to source your greens is from your backyard! If you have magnolia, ivy, cypress, boxwood, or holly growing in your backyard, get your clippers and get cutting! Always cut the branch at an angle close to the joint. This prevents damaging the tree and keeps the greens fresher for longer. It’s easier for the stem to absorb water if it has been cut at an angle.

If you don’t have a backyard or don’t have the right plants growing, head to a garden center or plant market and start browsing. Most markets will have a lovely selection of holiday greens and flowers to choose from. Be sure to pick up a variety of sizes, textures and colors for the best fresh green arrangement. Always buy more than you think you need to cover any mistakes. You can make smaller arrangements with the leftovers.

Finally, if you’re trimming your own Christmas tree, don’t throw the extra branches away! Use them in your arrangements. This is a great way to save a bit of cash and reuse what you already have! The feathery branches from a Christmas tree are perfect for the base of the arrangement. 

Step Two: Preparing the foundation

Once you’ve sourced your fresh greens it’s time to prepare your foundation. We recommend getting a few blocks of floral foam to provide structure and keep your greens fresh as long as possible. Soak the foam in advance. 

Using floral foam at the bottom of a vase or urn is one of our favorite ways to make a fresh greens arrangement. These larger arrangements look beautiful outside and inside your home, beside doors, and next to fireplaces. Once the foam has been soaked, it’s time to get arranging!

Step Three: Making the base 

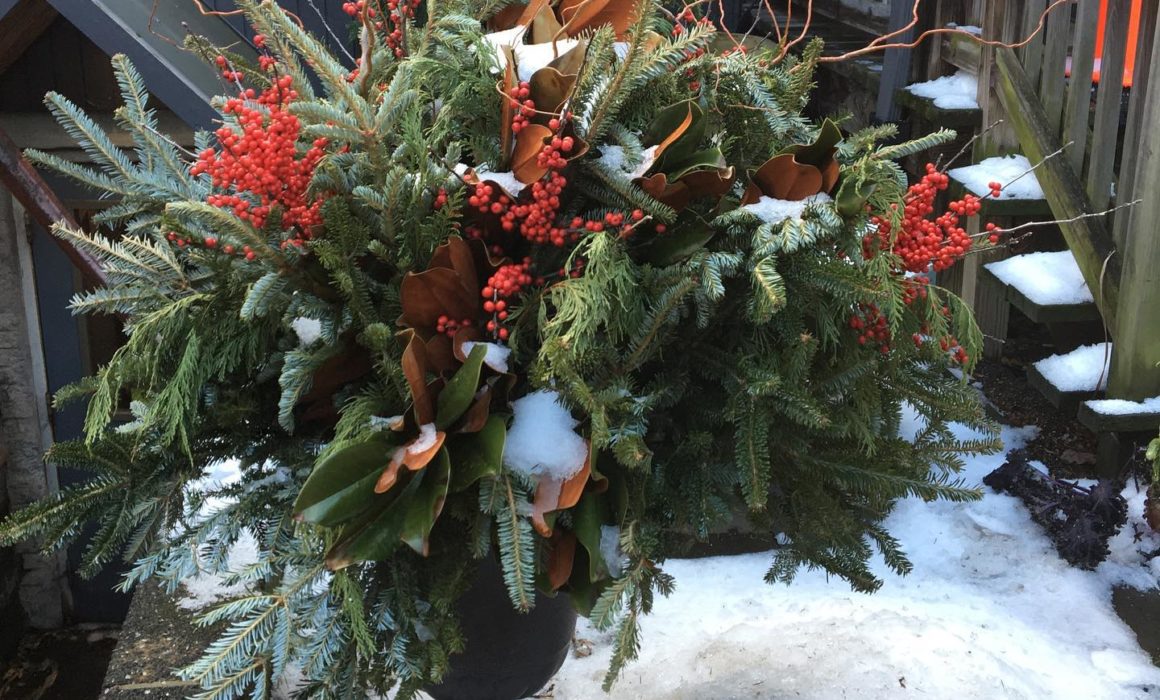
We recommend building the arrangement in the area that it will be displayed. This gives you a sense of how large the arrangement should be, and how it will look against its surroundings. Make sure you have a pair of clippers on hand when arranging the greens. This allows you to trim each branch as needed. Start with your bulkier, feathery greens to create the base of your arrangement. The fuller the arrangement, the better. Greens such as cypress, fir from your Christmas tree, and juniper have a lot of body to them and make a fantastic base. Where possible, stick the stems directly into the floral foam to ensure they get water and stay green.

Build up the body of the arrangement until it’s looking full but there is still plenty of room for the details. Aim for about two-thirds full. You can always take away or add more as you go on.

Step Four: Get creative 

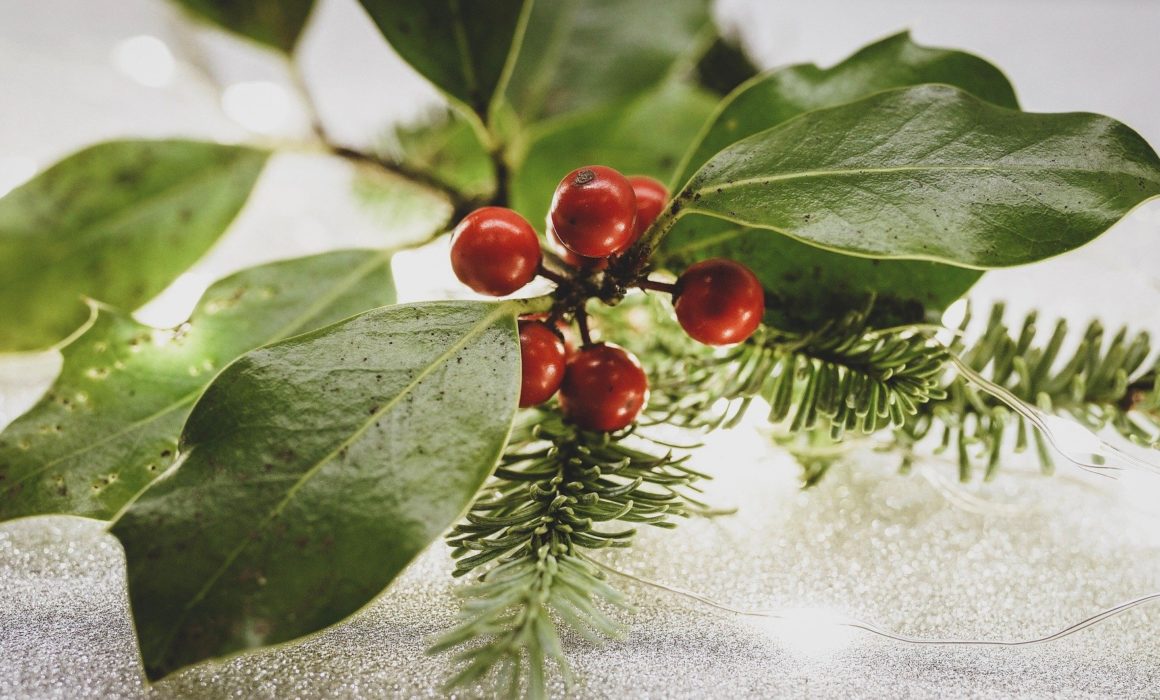
This is the part where you should get creative and let your imagination do the talking. Fill in any gaps with more delicate leaves and details. Adding willow branches gives wonderful height. Magnolia leaves add a beautiful texture and still look amazing once they’ve dried out, perfect for the winter!

Be sure to add color. Add brown and orange leaves and branches. Make sure to add some red for a festive touch. Winter berry, Holly, and Poinsettias simply scream “holiday season,” so intersperse those within your arrangement. You can also use pinecones by attaching them to some floral wire and sticking the wire into the floral foam. Remember: the fuller the arrangement, the more beautiful! 

Don’t be afraid to play around in this step. If you add something in and it doesn’t feel right, take it out and try again. 

Step Five: The finishing touches

When you think you’ve finished, be sure to look at the arrangement from a few feet away. Add more base greens if necessary. Move branches around, and be sure the color is evenly dispersed. Look at it from different angles that it’ll be viewed from. Once you’re sure it’s perfect, add a red or tartanware ribbon around the vase or urn.


How To Have An Eco-Friendly Christmas

Christmas is the most wonderful time of the year, right?

Delicious food, cheesy music, and the chance to catch up with friends and family you haven’t seen in a while. However, the festive period isn’t quite as kind to the environment as it is to our social lives. This is because we tend to produce a lot more waste during this time – particularly in the form of leftovers and wrapping paper.

However, don’t worry! There are plenty of ways in which you can have an Eco-Friendly Christmas in 2021. Here are some top tips that you can use to get started! 

Use eco-friendly wrapping paper. 

According to a recent report, approximately five million tonnes of additional waste are produced during the festive period in the US alone. From this, around four million tonnes of waste can be attributed to wrapping paper and gift bags, which, as you can imagine, accounts for a lot of the trash sent to landfill sites during this time. This is because wrapping paper can sometimes be difficult to recycle, especially when covered in glitter. Therefore, one way you can have a ‘greener’ Christmas is by buying eco-friendly wrapping paper. This could include:

  • Wrapping paper made from recycled products.
  • Brown Kraft paper 
  • Fabric
  • Old or discarded wallpaper 
  • Tissue paper.
  • Biodegradable wrapping paper. 

Additionally, there are some creative ways to reuse wrapping paper as opposed to simply throwing it away. For example, you could frame small sections of the paper to create interesting artwork for your home. If your paper is particularly festive, you can use these frames to decorate your home at Christmas. However, if you opt for something a little more low-key, such as geometric patterns or bold colors, you could use wrapping paper to create a unique interior liner for your cupboards and cabinets. 

Make your own wreath and table decorations. 

Decorating your home for Christmas is one of the most exciting parts of the festive period – whether your tree is carefully color-coordinated or a mix of bright and bold shades. However, if you’re looking to purchase a wreath or similar table centerpiece, then you might want to stay away from the models you can buy in shops. While they look great, they often contain lots of plastic and glitter, making them difficult to recycle properly. Instead, why not try to create your own arrangement using fresh greens. Not only is this a fun craft project, but it also means that each of your decorations will be unique! 

Shop local.

Shopping local for food and gifts is another great way to ensure you are being a little more sustainable this Christmas. This is because these products will not have to be delivered to your door, causing a great deal of pollution (especially if they are coming from the other side of the country or even abroad). Furthermore, supporting local businesses through the pandemic is a great way to help smaller companies stay afloat during a difficult time. Typically, you can also get better value for money from these shops, too – meaning everyone is a winner! 

Use LED Fairy Lights.

Fairly lights are one of the easiest ways in which you can give your home a Christmas makeover. However, you should, where possible, try to buy LED fairy lights as they are much kinder to the planet than other forms of fairy lights. This is because they are incredibly energy-efficient. This also means that the products have a longer shelf-life, meaning that you won’t have to buy new lights each year. 

Monitor food waste.

We all use the festive period as an excuse to indulge a little – whether you’re having a second helping of stuffing or returning to the dessert table after dinner. While we should all be enjoying ourselves during this time, it’s also important that we take food waste seriously. In fact, we throw away approximately four million roast dinners on Christmas day in the US alone. Thankfully, there are various ways in which you can keep food waste to a minimum. For example, you can: 

  • Figure out exactly how much food you need ahead of time, and do not buy any extra products.
  • Freeze leftovers.
  • Donate leftovers to local charities/food banks.

Do you have any more tips or tricks you use to make your Christmas as eco-friendly as it is merry? Be sure to share them below; I’d love to hear from you!


How To Design The Perfect Powder Room

Whether you are looking to increase the value of your property or win over your guests with a home with the wow factor, you can’t go wrong with introducing a powder room to your property. Not only are they highly practical, but they’re also a great way to put your creativity to the test as you’ll be working within a relatively small place. 

What exactly is a powder room? 

A powder room, sometimes referred to as a half bathroom, is a secondary bathroom space within your home that typically contains a sink, toilet, and some form of vanity. They are installed partly for convenience, due to the fact that you can use them whenever guests come over. If you have your powder room on the ground floor of your home, you no longer have to send guests upstairs when you need to clean the bathroom (which means you can get away with doing less cleaning before a big event). 

How to design the perfect Powder Room. 

Whether you already have a powder room in your home or have recently undertaken some renovations to install one, the difficult part of the process is deciding exactly how you want it to look. Not only do you need to make sure you find a way to maximize the space you have available to you, but you must also remember that having a limited room doesn’t mean having limited design options. You just have to be creative!

With that in mind, here’s a quick look at one of our most recent powder room transformations! 

The Color Scheme.

The first step to designing ANY room is choosing a color scheme or theme. Having made this decision, you’ll find it much easier to source the materials you need from the transformation, from wallpaper to furniture. In this case, we decided to go for a silver/grey/ taupe color theme, using white to complement these shades. This color scheme gives the powder room a sharp, sophisticated edge – like something you’d see in a fancy hotel. 

The Flooring.

Tiles are always an excellent choice for any kind of bathroom or powder room because they are strong, durable, and easy to clean. As a result, it’s definitely worth splashing out on luxury products as they’ll become a long-term fixture in your home. Here, we used Marble Herringbone Tiles to bring some luxury into the space, 

The Wallpaper.

When hanging wallpaper, it’s important that you make a statement. After all, this often becomes the focal point of the room and really ties everything else together. In this case, we installed Brunchwig et Fils wallpaper – which features a stunning nature-inspired design. The name of this particular design is ‘Bird & Thistle Wallpaper,’ and while we purchased this in the shade silver, there are various other colors to choose from, including aqua, green, blue, and red. This is great for those looking to bring a pop of color into their powder rooms. 

The Sink & Toilet. 

When choosing plumbing fixtures for your powder room, it’s important that you think carefully about the kind of products that you want to use. Remember, you have to make sure they fit nicely into the space while also matching the rest of your design choices. In this case, we opted for a pedestal sink – which is the most popular style of sink amongst consumers at the moment. We paired this nicely with a Toto Toilet.  

The finishing touches.

Once you’ve covered all of the above steps, it’s time to start thinking about the finishing touches that will help make the powder room truly your own. In this case, we hung a stunning gold mirror above the sink. Additionally, my client requested that we install this polished brass Woodpecker Door Knocker – which is a truly stunning (and unique way) to finish off the space!

Before and After.

It wouldn’t be a room transformation without showing you a before and after picture! 


Kelley Astore Interiors

Expert Interior Design & Renovation Services of Every Style.

Where We Work

Northern Virginia, Washington, DC,
and the Greater Washington Area

GET IN TOUCH
Connect

Privacy Settings
We use cookies to enhance your experience while using our website. If you are using our Services via a browser you can restrict, block or remove cookies through your web browser settings. We also use content and scripts from third parties that may use tracking technologies. You can selectively provide your consent below to allow such third party embeds. For complete information about the cookies we use, data we collect and how we process them, please check our Privacy Policy
Youtube
Consent to display content from Youtube
Vimeo
Consent to display content from Vimeo
Google Maps
Consent to display content from Google
Call Now ButtonCall Us For A Quote!