Installing a Beadboard Ceiling

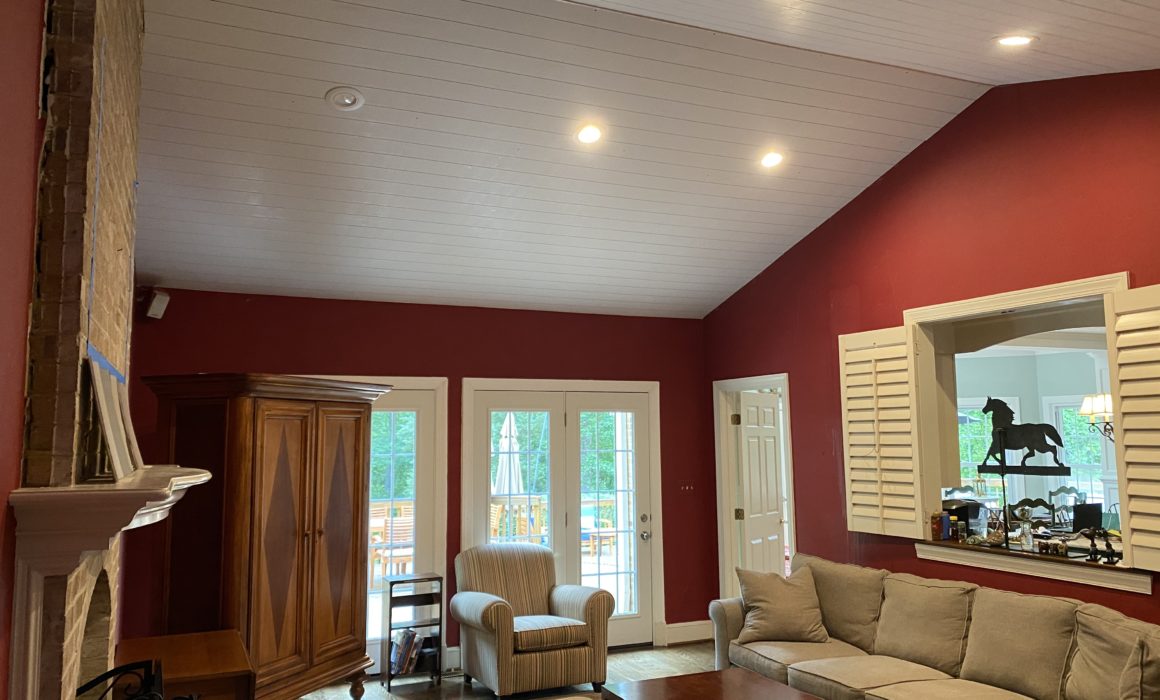
Interior design is all about the dimensions and texture of a space. Often, it’s the finer details that make the biggest difference to a design. My job is to find where these details can be added to create those dimensions. I am currently working with a client in Reston, Virginia to remodel their living room. It is a beautiful space with loads of potential. One of the most striking aspects of the room is its shape: specifically the cathedral ceilings that reach 20 feet high. I wanted to highlight these beautiful high ceilings without distracting from the living room’s other key features, like the fireplace. 

With that in mind, my client and I agreed on installing a beadboard ceiling: the perfect way to add that extra dimension and texture!

What is beadboard?

Beadboard or beadboard paneling refers to lining up equal-sized planks of wood vertically or horizontally to cover a surface. It is frequently used on walls, covering the bottom half or even the full length. It adds that extra texture for the eye to land on, but it remains subtle. Depending on how you install and style beadboard paneling, it can be elegant, natural, rustic, classy, or all of the above.

We decided to install the paneling to run horizontally. This will help the room appear a bit wider than it actually is. Keep reading to find out how we installed the beadboard ceiling and how it ended up!

Prepping

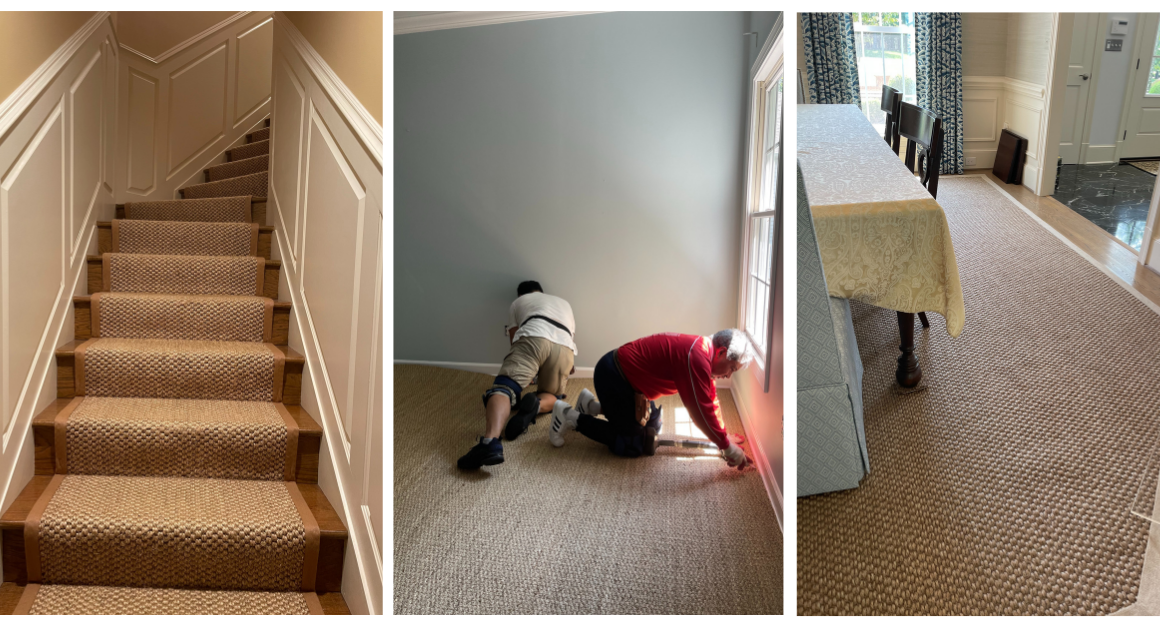
Like any design project, the first step was to prep the space and the materials. Because the ceilings are 20 feet high and the panels are so long, we knew that simple ladders would not be enough to install the beadboard. We opted for scaffolding instead. However, that meant that the very first step for our team was to completely remove all the furniture from the living room and into the garage to make space for the scaffolding. Once we cleared the room, we set up our scaffolding and got to work preparing the materials. 

As usual, my team and I measured and cut the boards on site. Thankfully, my client’s garage was large enough for us to prepare the panels. You can see in this photo that it took two people to cut these boards because they were so long! We also had to cut special beadboard panels to fit around the lights in the ceiling. This would’ve been difficult to do if we weren’t able to do it on site. 

The last step we took to prepare for the installation was removing the existing molding around the top of the brick fireplace. Once that was done, we were ready to begin installing the ceiling!

The installation

A project like this requires many hands-on board to ensure that it is done efficiently and more importantly, safely. We were essentially hanging up long heavy wooden planks from 20 feet high. Needless to say, safety was a priority. For this reason, I made sure that a few people on my team were there throughout the installation to help prop the boards up as they were secured into place.

For ease, we decided to use a nail gun to fix the beadboard panels. We started with the outside edge of the wall and moved inwards and upwards to the center. Once one side was done, we repeated the same process on the other side. This was a tedious and laborious task, but my team of contractors are amazing and were able to get the job done very efficiently!

Future plans

I absolutely love how the beadboard ceiling installation turned out. But the design is far from finished. The ceiling boards now need to be caulked and painted, but we won’t be able to do that until we tackle the rest of the room. We are planning to install two built-in bookcases on either side of the fireplace and redo the mantle. The blue tape in the image is where a TV will eventually go up. After that, some fresh coats of paint will bring the design together and my clients will be able to enjoy their new living room.

If you want to stay updated on how the rest of this renovation goes, be sure to follow us on Instagram, Facebook, LinkedIn, or Pinterest! If you’re interested in renovating your home, visit our services page to book your free consultation today!


Sisal Flooring Installation

I’ve been working with a client in the Great Falls, Virginia area to transform her dining room. It has truly come a long way! First, we installed a grasscloth wall-covering, which helped the room appear larger. Next, the window treatments were installed with beautiful blue and white draperies, and the chairs were reupholstered with a subtle blue and white pattern. It already looks like an entirely new dining room. However, there is just one more major change that I know will take this room to the next level. Keep reading to find out how we finished the dining room transformation with a sisal rug installation!

Why Sisal?

After a difficult year and a half, a lot of people have had the chance to reground and reevaluate what’s truly important to them. While society seemed to pause, nature and Earth around us kept on spinning. It’s no wonder then that a major design trend at the moment is bringing nature indoors. And that has been a massive inspiration for this particular dining room transformation, hence the grasscloth wallcovering. But I didn’t want to stop there. I wanted to find the balance of elegant and classy with natural and warm. That’s why I knew the finishing step of this transformation had to be sisal flooring.

What is Sisal?

Sisal, scientifically known as Agave sisalana, is a plant native to Southern Mexico. It harvests stiff fibers that have been traditionally used to make ropes, but is also used for hats, footwear, or in this case, carpeting! I love using Sisal rugs/carpeting both for practicality and aesthetics! Not only does it bring that hint of nature inside and look amazing, but it is extremely durable and sure to last a lifetime. 

Installing Sisal

Sisal works best when it is cut to size and bound on site for installation. This gives the designer the most control over the end result, ensuring that the shape and installation of the sisal fit the space perfectly. My contractor glues the binding down and then topstitched it to make sure it doesn’t unravel and that it has clean edges. For this dining room, we laid down a rug pad for comfort and to protect the wooden flooring below the sisal. We paired this particular rug with a 2.5-inch sisal jute border, for a nice subtle contrast.

We also made sure to make the rug considerably larger than the dining room table being placed in the center of it. In fact, we left only a small border of the wooden flooring uncovered. If we were to make the rug fit perfectly underneath the table and chairs, with a lot of wooden floor still showing, the room would appear much smaller. And this entire transformation has been focused on making this room larger, as seen with the grasscloth wall covering.

I think the sisal matches the walls and brings a casual elegance to the design. It is similar tonally and thematically to the grasscloth walls. It opens up the space and pays homage to nature in the process!

Different Sisal Flooring

There are many more options for using sisal flooring other than with a rug. For a different client in the past, we’ve installed wall-to-wall sisal, which is fantastic for those areas of the house that get walked on a lot…nobody likes the look of a worn-down carpet! For the same reason, sisal makes fantastic stair runners. You want a stair runner to be practical as well as beautiful, and sisal gives really great traction. This is perfect for anyone who struggles to get up and down the stairs safely. 

Whether we are installing a sisal rug, wall-to-wall flooring, or stair runners, we are also sure to install it over a jute pad for comfort and durability. We source all of our sisal from a fantastic company called DMI, who provide all different types of natural flooring and carpeting. 

Nature is the best designer

Having been in the design industry for over 25 years, I can confidently say that nature has always been and will always be the best designer there is. I love how this dining room transformation turned out. It really goes to show that nature is transformative and fluid. There are endless ways to incorporate natural materials into a design while still looking elegant and timeless. 

To spruce up your home with sisal, head to our services page to book your free consultation! 


Dining Room Details: Draperies & Chairs

In my last blog article, I took you through the process of installing grasscloth wallpaper for one of my clients in The Great Falls. It really transformed the room! Once it was installed, the room appeared larger, more open, modern, and elegant. It’s now time to update other key features of this dining room for a full transformation!

Window Treatments

The first thing we had to address, of course, was the windows. My client needed some form of window covering. We went back and forth between a few different options. The original dining room was painted a sea-blue. And while it was over-powering and didn’t work for the space when it covered the walls, my client and I wanted to still incorporate that vibrancy into the new design. Because of that, we chose a beautiful blue and white fabric from Kravet, the same company we sourced the grasscloth from. 

When deciding what type of window treatments to install, we had to think about the effect we wanted them to have in the room. I wanted to work on making the space appear taller. Because it was the dining room, rather than a home office for example, it wasn’t crucial that blackout shades were installed. It was a dining room and the treatment was not being used for privacy or necessary for room darkening. After weighing our choices, we went for floor-to-ceiling draperies, using the fabric from Kravet. The vertical lines that the drapery created was a lovely contrast to the horizontal paneling on the wall. The blue provided a lovely pop of color without taking over the room.

Dining Room Chairs

Of course one of the most important features of a dining room are the chairs for your family and guests to dine in! At Kelley Astore Interiors, we are always looking to upcycle and reupholster outdated furniture for a new modern look. This is not only more sustainable but also ensures that no one else has pieces quite like you! So that is exactly what we decided to do with the chairs in this dining room. The frame of the chairs was in good condition, but the cushioning and fabric was looking a bit worn down. 

One rule of design to keep in mind is repetition. Repetition throughout a design gives way to a cohesive look that the eye is able to dance over. Keeping that in mind, I knew I needed to incorporate more blue in the design in order for the draperies to blend in. But again, I was wary of having blue overtake the entire room. Because of that, we chose another blue and white fabric to reupholster the dining room chairs in. I loved this fabric, sourced from Fabricut, because it offered that bit of color, while still maintaining a rather neutral look. Perfect for this dining room. The subtlety of the pattern and color of these chairs allowed the draperies to shine without sticking out. We upholstered both types of chairs in the same fabric, for cohesion. 

Still more to be done…

With new walls, chairs, and drapery, the room is nearly complete! You may have noticed another significant difference in the before and after photos…be sure to come back next week for an article on the flooring!

To see more before and after images be sure to follow us on Instagram, Facebook, LinkedIn, or Pinterest. If you haven’t already caught it, check out the front entrance transformation we did for the same client in Great Falls. If you would like to work with me on transforming any or all parts of your home, head to the services page to book your free consultation!


Kelley Astore Interiors

Expert Interior Design & Renovation Services of Every Style.

Where We Work

Northern Virginia, Washington, DC,
and the Greater Washington Area

GET IN TOUCH
Connect

Privacy Settings
We use cookies to enhance your experience while using our website. If you are using our Services via a browser you can restrict, block or remove cookies through your web browser settings. We also use content and scripts from third parties that may use tracking technologies. You can selectively provide your consent below to allow such third party embeds. For complete information about the cookies we use, data we collect and how we process them, please check our Privacy Policy
Youtube
Consent to display content from Youtube
Vimeo
Consent to display content from Vimeo
Google Maps
Consent to display content from Google
Call Now ButtonCall Us For A Quote!