Roman Shades In Your Bathroom

There are many different aspects that factor into designing the perfect bathroom. In many cases, this simply means finding the perfect balance between comfort and style – creating the kind of a space that not only looks great but makes you feel good too. After all, if you’re looking to unwind for an hour (or two) in the bath, you need to ensure your bathroom has a warm, welcoming atmosphere for you to settle down into and enjoy. 

To pull this off, you need to start paying attention to the smaller details that can add a touch of class and sophistication to the space. For example, you could add a marble finish to your vanity to give your bathroom the ‘WOW’ factor. However, you should also pay close attention to your windows. 

If there’s any room where privacy is important, it’s the bathroom. However, heavy or bulky curtains will swallow up all of the natural light, making your bathroom feel much smaller. Furthermore, they are also harder to clean, making them slightly unsanitary in a bathroom setting. However, there’s a clear solution in mind that allows privacy when necessary and will let the sunshine through when necessary – and that’s Roman Shades.

What are Roman Shades?

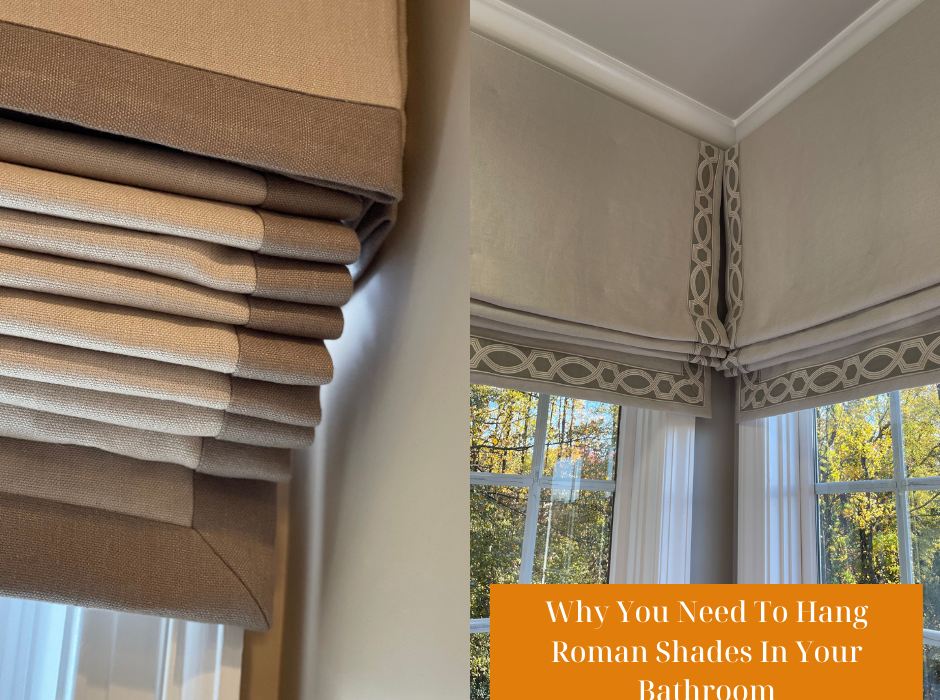
Roman Shades are some of the most popular window shades on the market – and for a good reason. They are highly practical, with a contemporary design that stops them from aging quickly. When opened, they stack up evenly on top of each other for a smooth finish. This is slightly different from the mechanisms used in traditional blinds, where the blinds are bumpy when opened. 

Why should I hang Roman Shades in my Bathroom?

There are various benefits to hanging Roman Shades in your bathroom. For example: 

  • Roman shades add a lovely, unique texture to your bathroom when pulled up. Furthermore, as they are available in a wide range of different colors and patterns, they can be a great way to liven up the space. For example, you could use your blinds as a way of introducing more color into your home. 
  • Roman Shades suit all different styles of windows, especially if you have narrower windows or window panels where it can sometimes be hard to find appropriate shades, blinds, or curtains. This is particularly important when you consider the fact that bathroom windows are often designed to be much smaller than other windows in the home, often to create more privacy. 
  • Roman Shades allow you to experiment every day. For example, if you install separate blind panels, you can experiment by having some blinds open and some closed – creating interesting shapes or textures in doing so. 
  • As mentioned previously, privacy is particularly important in the bathroom. While Roman Blinds are a great way to maintain your privacy, you can take this to the next level by installing black-out material to the back of them. 

How are Roman Shades installed? 

Roman Shades are highly versatile, which means they can be installed in various different ways – including both internal and external mounts. Once the mounts have been installed, the blinds should slip easily into place. However, you might want to reach out to some experts (or at least a friend who is a DIY-Whizz) who can help you to install them seamlessly. 

How do I clean Roman Shades?

As mentioned previously, Roman Shades are rather easy to maintain – but you should ensure you keep them clean. To clean your blinds, you should: 

  • Use a hand-held vacuum to gently remove dust from the surface. If the shades are made from delicate material or feature a lot of detailing, you may prefer to use a microfiber cloth to carry out these tasks. 
  • If you want to conduct a deep clean of your blinds, remove them carefully and take them to a dry cleaner who can use specialist equipment to help them look good as new once again. Sometimes you will be able to launder them yourself, though you should use a low temperature and a delicate cycle.

Shop The Look: Bringing My Dream Master Bathroom To Life

After years of designing luxury bathrooms for my clients – I decided it was time to bring my dreams to life and start working on my own Master Bathroom. And, now that this exciting project has come to completion, I thought I’d share the finished product with you so that you can shop the look and perhaps even emulate this within your own home! 

The Flooring. 

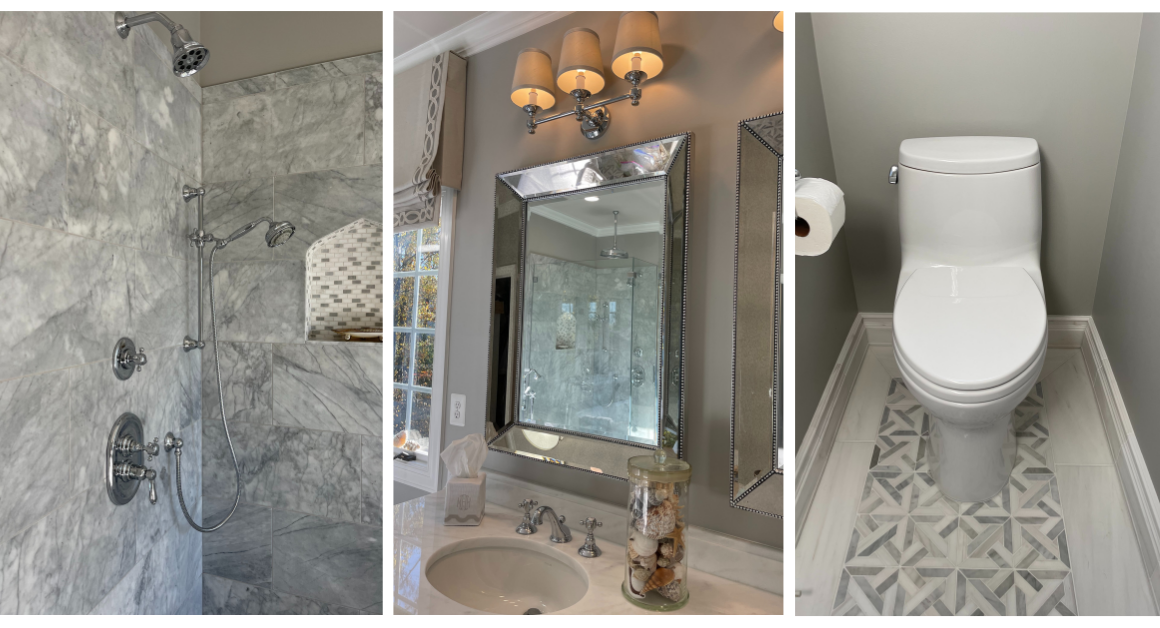
When designing my bathroom, I wanted to create a space that felt bright, open, and, most importantly, clean. Therefore, I decided to opt for a simplistic and neutral color scheme, which would also help me create a sense of luxury in my bathroom. To kickstart this color scheme and design, I opted for patterned marble flooring from Marble Systems. Here, the mix of grey and white is nicely complemented by a snow-white border and marble baseboard – giving the space a distinctive, luxury feel. 

The Walls. 

I believe that the bathroom is one of the best rooms in the house to experiment in when it comes to your design choices. However, having already chosen statement flooring, I wanted to go with something simple and stylish when it came to the walls. In the end, I chose a pale gray shade called Pavillion Gray from Farrow & Ball, which helps tie the entire room together. In keeping with the theme, I also purchased mirrors and vanity lights from Restoration Hardware. Initially, the vanity lights came with white silk shades – but I decided to cover them with pale gray silk instead so that they blended in nicely with the rest of the room. 

While making the most of natural light is a great way to breathe life into your home, you’re going to want some privacy in the bathroom. Therefore, I installed some gorgeous Roman Shades in a pale gray linen from Pindler. The embroidered tape is from Samuel & Sons.

The Vanity.  

A good bathroom needs a good vanity – whether you are checking your reflection before heading out to an important meeting or simply brushing your teeth. However, when I couldn’t find exactly what I was looking for when shopping around, I decided to design my own vanity. The vanity is painted in the shade China White from Benjamin Moore, with a white marble finish from Marble Systems. Here, the marble and wood blend together seamlessly for a luxury finish. The vanity features lots of storage space with stunning polished chrome hardware for a little extra sparkle and shine. 

The Bathtub & Shower. 

If you are looking to make a statement (or a splash) in your bathroom – then I’d recommend going all out when it comes to choosing a bathtub and shower. When redesigning this space, I purchased the shower, tub faucet, and vanity faucet from the House of Rohl, all of which are finished with polished chrome for a clean, sparkling finish. The bathtub features a faucet and handheld unit, while the shower features a rainfall showerhead, a main showerhead, and another handheld unit. Other plumbing fixtures within the bathroom, such as the toilet itself, were purchased from Toto USA.

If you’re looking to transform your bathroom but aren’t sure where to start, please do not hesitate to get in touch today. Whether you’re looking for inspiration or a complete remodeling – we’re on hand to bring your dreams to life.


Small Change, Big Impact: Recessed Lighting Installation

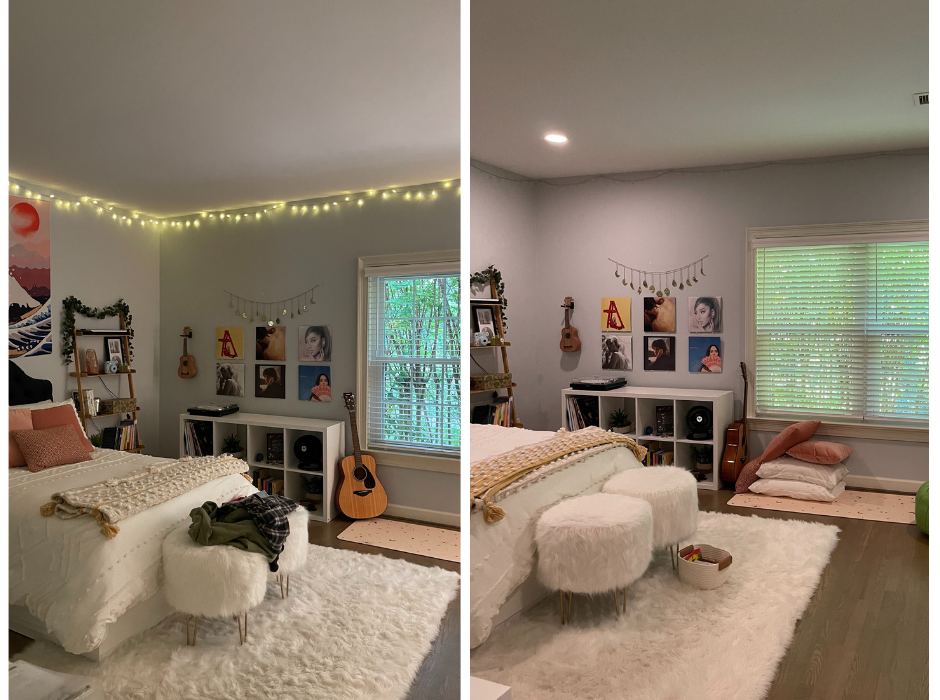
I recently had the pleasure of working with a family in Great Falls to make some key changes to their home. When it came to their teenage daughter’s room, we weren’t planning on doing too much – often allowing teenagers to control and decorate their own room can be a great form of their self-expression, and great for their mental health. But when I looked around her room, I knew one key change would have a major impact. She needed a lot more light! Keep reading to find out why and how we installed recessed lighting into this teenage girl’s room.

The Need

The light in a room is crucially important – it completely sets the mood and atmosphere. Additionally, there’s a major practical element that comes with lighting. For instance, in her room, there was no lighting installed, just a large window. And while this window may have been able to let in an appropriate amount of light, it was entirely shaded by a crape myrtle. Even if it didn’t, I still think she still would’ve needed ceiling light – for instance in the wintertime when the sun sets before she’s had time to do her homework at her desk. It was clear that she wanted a bit more light as well, with the way she had set her room up. There was a floor lamp and string lighting along the ceiling. While that lighting may have been nice right before bed, it wasn’t nearly enough light, and areas like her desk were left in the shade.

Installing something like ceiling lighting takes trained contractors and is likely beyond the breadth of a DIY home decor video on youtube. That’s where my team and I came in. We decided to go for recessed lighting, rather than say a hanging ceiling light, for a few reasons. The first is that the ceilings of this bedroom were not particularly high. Therefore, anything that was hanging or coming out from the ceiling would make the entire room feel shorter all together. Additionally, because of the size of the room, and especially where her desk was, I wanted to make sure that a good amount of light reached all corners of the room. Just one central light wouldn’t do that to the same effect as something like recessed light. Recessed lights are installed into the ceiling and lay flush against it. You almost always install more than one light, which gives you easy control over where in the room they’re placed. Because of this, I knew that installing recessed lighting was the way to go. My team and I got to work.

Let There Be Light

We decided to install four lights, approximately 25” from each corner of the room. This was going to bring symmetry and ensure the entire room had even lighting. The lights needed to be big enough to provide enough light for the room, but if they were too big, they would easily become an eyesore. 6 inches seemed to be a perfect size.

The actual process of installing the recessed lighting involved making cuts into the ceiling where the lights would be installed – it’s really important that these cuts are perfectly placed and the perfect size for the light, which is why we’d always suggest getting a professional in rather than attempting to do this yourself. Once the holes were ready, my contractor wired the electric through and installed the lights. We used LED bulbs which last much longer and use less energy – better for the environment. 

Out of Darkness

The finished result almost seems like a different room. Not only does this new lighting mean she won’t have to spend her mornings and evenings in the dark, but her desk will be well lit for her to use. Additionally, the extra light allows you to better see the wall art and decor, giving you an insight into who this bright young lady is. I’m really happy with the final results. But of course, the most important thing is that my clients were also really happy with the final results.

If you think an area in your home is in need of new lighting, get in contact today! At Kelley Astore Interiors, we have ongoing relationships with a range of licensed contractors and skilled craftsmen who work under our supervision on all our projects. Get in touch to book your free consultation today!


Kelley Astore Interiors

Expert Interior Design & Renovation Services of Every Style.

Where We Work

Northern Virginia, Washington, DC,
and the Greater Washington Area

GET IN TOUCH
Connect

Privacy Settings
We use cookies to enhance your experience while using our website. If you are using our Services via a browser you can restrict, block or remove cookies through your web browser settings. We also use content and scripts from third parties that may use tracking technologies. You can selectively provide your consent below to allow such third party embeds. For complete information about the cookies we use, data we collect and how we process them, please check our Privacy Policy
Youtube
Consent to display content from Youtube
Vimeo
Consent to display content from Vimeo
Google Maps
Consent to display content from Google
Call Now ButtonCall Us For A Quote!